Tuesday, September 30, 2008

Grand Opening!!

I interrupt this post to bring you an important announcement. The Everyday Dish site has been beautifully redesigned with all kinds of wonderful features, and is making it's debut launch today. Yay!! We are so excited about it, and hope that you enjoy it as much as we do. Go check it out!

In other news, there's also a rice pudding video up on the new site, which is really good. You've got to go make yourself a pot ASAP! I use hemp milk for the video, but any non-dairy milk will work too. I have to say though, that I really like the creamy taste of Living Harvest hemp milk or soymilk in this recipe.

Oh, I forgot to add that we also have a new blog on the Everyday Dish site. The blog is called "Dish", and it's where I get to highlight cool vegan products, from food to cookware to makeup and shoes. If you've got the lowdown on something awesome that I've just got to highlight, let me know. I'm always on the lookout for new fun products.

Now go check out the site!

Wednesday, September 24, 2008

Homemade Kosher-Style Dill Pickles

As you can probably tell by now, I love making food from scratch. It's usually fairly easy to prepare, can be customized to your palate and tastes, and is better than anything you could buy at a store. I like to think of homemade food as the ultimate in Artisan craft.

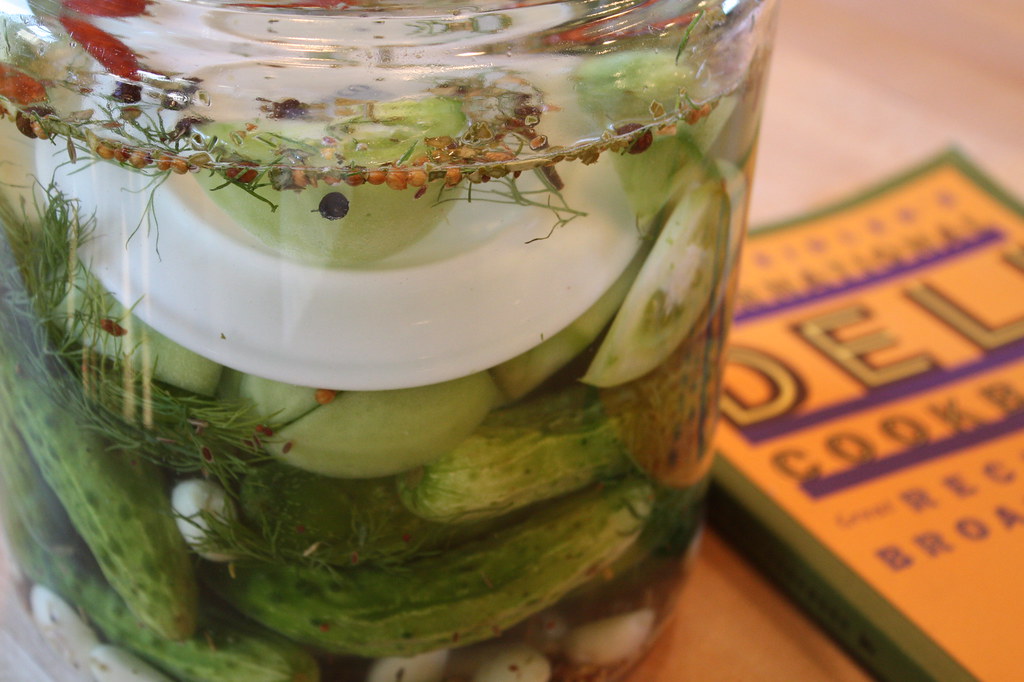
So what's my latest project you ask? Pickles. My love of pickles goes way back to childhood, to the awesome bowls of sour dills that would grace the table at our local deli. I loved the crunch of these freshly pickled cukes, the salty yet lightly sour taste. These pickles bared no resemblance to the softer, vinegar-flavored pickles found in grocery stores. These were the real deal, true deli-style salt-brined Kosher dill pickles. It took me a long time to find a recipe that fit this bill. I am happy to say though that it was not in vain.

In the early 1990's a modern, hip-style deli opened in Santa Monica, California. The concept of the Broadway Deli was Jewish deli meets hip eatery. They had lots of inspired dishes on their menu, artisan breads and great desserts. In 1994, they came out with a cookbook, and right there in it's pages was the recipe that I had been searching for: true, salt-brined Kosher dills.

I don't think that the cookbook is any longer in print, so I'm going to post the recipe here. Feel free to add green tomatoes, lots of extra garlic and even dried or fresh chili peppers. I hope that you enjoy them as much as I do. They're really quick and easy to make, and can be stored in your fridge for quite a while. Plus, you should be able to find pickling cukes at your local farmer's market right now. If you have lots of green tomatoes on your tomato vines, which won't have a chance to ripen before the cooler Fall weather rolls in, this is a perfect thing to do with them.

Broadway Deli's Quick Dill Pickles
(makes 10 to 12 pickles)

These pickles taste just like the one's grandma used to make, only they're faster and easier to prepare. To transform bumpy little cucumbers into crisp, garlicky dill pickles, place all of the ingredients in a jar, cover, and shake. In four days you'll have the best dill pickles you've ever tasted.

4 quarts boiling water, for cleansing jar
3 tablespoons pickling spices
6 cloves garlic
10 to 12 firm, small pickling cucumbers (about 1 1/2 pounds)
1/4 cup Kosher salt (preferably Morton's brand, which is saltier than others)
1 bunch fresh dill

1. Pour boiling water into a 1-gallon canning jar and pour out. Drop pickling spices and 3 of the garlic cloves into the bottom of the jar. Arrange cucumbers in the jar to fill just up to the neck. Top with salt, remaining 3 garlic cloves, and dill. Add cold water to cover. Cover securely with the lid. Shake well and let stand for 3 to 4 days in a cool, dark place before serving.
2. Refrigerate after 4 days to stop the pickling process. The pickles will keep for several weeks, covered, in the refrigerator.

Variation: Replace cucumbers with green tomatoes.

Recipe adapted from Judy Zeidler's International Deli Cookbook; Great Recipes From The Broadway Deli, by Judy Zeidler, Chronicle Books, 1994

P.S. If you're wondering why there is a plate in my pickle jar (in the photo), it's because I doubled the recipe and topped the cukes with a plate. This helps to keep the pickles submerged in the brine.

Tuesday, September 16, 2008

Gluten Free Cookie Bars

I've been wanting to try gluten-free baking for a while now, but I just wasn't sure where to start. Thanks to a good friend recently, I was able to dive right in.

This friend was trying out a gluten-free diet (per doctor's orders), and was having the worst craving for chocolate chip cookies. I could feel her pain, and knew I had to help her out. I ran home, did a little internet research, and found a recipe for cookie bars. Fortunately I had a bag of gluten free all-purpose baking flour from Bob's Red Mill already in my pantry, so I was ready to go. I adapted the original recipe based on what I had on hand, but I've gotta say that this is one of my favorite cookie bars ever! Gluten free or not! So, a giant thank you to Karina Allrich for sharing your gluten free cookie recipe. You can bet that I'll be doing a lot more gluten free baking in the future.

I decided that this recipe was so good, we had to get it filmed and up on Everyday Dish (with my adaptions, of course) ASAP. The video can be seen here, and the recipe here. For Karina's original recipe, you can find it here at her website. Her site is not vegetarian, although there are quite a few vegan recipes.

As for me, I am thinking about making a gluten-free pumpkin cake next. Hmmm, or maybe an apple spice cake. Now that I have the gluten free flour on hand, anything is possible.

Thursday, September 11, 2008

I wanted to let you know that there's a new recipe & video up on Everyday Dish, for Blue Willow pasta. The recipe is from the chef at Jam On Hawthorne (in Portland, Oregon), and is really good! It includes a yummy recipe for a tofu marinade, that would work well for a variety of tofu dishes. This reminds me that I should marinate some tofu for quick weeknight meals.

Also, there was a really good question about the cracker recipe and I thought I would answer it here. The question was about baking crackers on a Silpat. I tried baking the crackers on both parchment and Silpat mats. I prefered the Silpat mat. The crackers came out crispier (and thus better) on the Silpat. This is not always the case for every recipe, but the mat won out here.

I'm hooked on the homemade crackers! I plan to do lots more experimenting with other flavor combos. I love the idea of using different flours, seeds and spices. Homemade snacks are the best! Thanks for all the awesome comments on the recipe.

Thursday, September 4, 2008

Crackers

I have a new favorite obsession. Homemade crackers. It really started just the other day. My kids were asking me to buy them snacky food that they could take in their school lunches. I just couldn't do it. One, because I get tired of all the junky ingredients in a lot of those snacks. The other reason is that I have a ton of whole grain flours that are screaming to be used (and hey, I could save money at the same time). So rather than head out to the store, I headed to the kitchen and started making crackers.

The crackers are so incredibly easy to make, almost easier than making cookies. They also contain healthy ingredients, most of which we all have sitting in our pantries. And the best part? My kids absolutely loved them! They polished them off and asked for more. Being the sneaky mom that I am, I said I would show them how to make them. That way, when the craving hits, they might actually try and bake themselves up a batch. Well, you never know.

Feel free to play around with the flours or seasonings. I did find that my kids preferred the crackers when I used half all-purpose flour and half white whole wheat. I also discovered that they not only baked better on a Silpat (silicone pan liner), but they practically flew off the baking sheet. If you have one of those nifty pastry wheeler/cutter, it works really well for gently cutting the crackers into squares. Otherwise you can just roll the dough out thinly in the pan, bake, and then break into pieces when cool.

Here's the recipe for those of you who would like to try your hand at homemade crackers. I promise you it's painless and fun! It's also a perfect project to do with young kids or on a rainy day. Once you go homemade you'll never go back.

Julie's Rosemary Garlic Crackers
1 cup all-purpose flour
1 cup white whole wheat or whole wheat pastry flour
2 tbsp nutritional yeast
1 tsp baking powder
2 tsp dried rosemary
1 tsp granulated garlic
3/4 tsp fine sea salt
1/4 tsp ground pepper, optional (but good!)
1/2 cup water
3 tbsp extra virgin olive oil
Coarse sea salt crystals, optional

1. Preheat oven to 400°F.
2. In a bowl, mix together the flours, nutritional yeast flakes, baking powder, rosemary, garlic, salt and pepper. Add the water and oil, stirring until dough comes together. If dough is too dry to mix, add another tablespoon of water or as needed. Divide dough in half.
3. Roll the dough out very thin. If you have a small little rolling pin, simply roll the dough right out in your pan. Transfer the dough to a Silpat or parchment-lined baking sheet. Score the dough into squares so that it's cut, but not separated into pieces. If desired, sprinkle a little coarse salt over the tops of the crackers and lightly press into dough with the rolling pin. Repeat with second piece of dough.
4. Bake crackers in preheated oven for 15 minutes, or until golden and crackers look crisp. Let crackers cool in pan before removing. They will crisp up as they cool. If crackers are still a little soft, place bake in oven and bake for another five or so minutes until crisp.

Copyright © 2008 Julie Hasson


Here's some pics of the cracker-making process.

Dough

Rolled dough in pan

Scored/cut cracker dough, ready for baking
(with the pastry wheel/cutter)

Baked and cooled crackers. You can kind of sea the little salt crystals on the tops.